Back to Home
Page of CD3WD Project or Back to list of CD3WD Publications
 |  |  | Riveting - Course: Technique for manual working of materials. Trainees' handbook of lessons (Institut für Berufliche Entwicklung, 22 p.) | |  | (introduction...) | | | 1. Purpose of riveting | | | 2. Kinds of rivets | | | 3. Kinds of riveted joints | | | 4. Tools and auxiliary means for riveting | | | 5. Calculations for the selection of rivets |  | | 6. Technological process of riveting | | | 7. Loosening of a riveted connection | | | 8. Riveting faults |
|
6. Technological process of riveting
On principle, the following sequence of operations is necessary
for a riveted connection:
6.1. Clamping/drilling:
All plates to be riveted must be clamped with one another as
tightly as possible and be drilled together.
With separately drilled parts, attention has to be paid that
misaligned holes are reamed by a structural reamer.
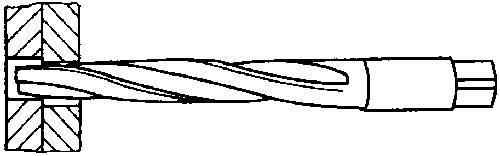
Figure 23 - Reaming of misaligned bore
holes
Rivet holes have to be drilled a little larger the
diameter of the rivet shank:
For rivets thicker than indicated in the table, the bore holes
are made by 1 mm larger than the diameter of the rivet shank.
|
Recommended values |
|
D |
DB |
|
1 |
1.1 |
|
2 |
2.2 |
|
3 |
3.2 |
|
4 |
4.3 |
|
5 |
5.3 |
|
6 |
6.4 |
|
8 |
8.4 |
D = diameter of the rivet shank
DB =
diameter of the bore hole
6.2. Deburring/countersinking;
Rivet holes are always debarred with the help of a
countersinking cutter; for countersunk-head rivets, countersinking must be made
by the 75° countersinking cutter. For this, the recommended values are to
be found in the marginal table:
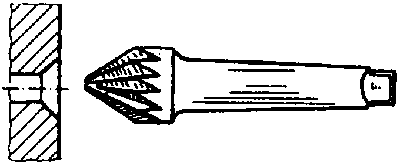
Figure 24 - Deburring/countersinking
|
Recommended values |
|
D |
DS |
|
1 |
1.8 |
|
2 |
3.5 |
|
3 |
5.2 |
|
4 |
7 |
|
5 |
8.8 |
|
6 |
10.3 |
|
8 |
14 |
D = diameter of the rivet shank
DS =
countersinking diameter
6.3. Inserting/setting
The rivet is inserted into the bore hole, the workpieces are
placed on the riveting support in such a way that the set head is underneath. By
hammer blows on the rivet setter, the plates are pressed together and the set
head draws itself to the workpiece.

Figure 25 - Inserting/setting
6.4. Upsetting
By a couple of hammer blows accurately in the direction of the
longitudinal axis, the rivet is upset - until it fills up the bore hole
completely.

Figure 26 - Upsetting
6.5. Preforming/heading
By even and steady blows around the rivet head, the rivet head
is preformed, if a button head riveting shall be made.
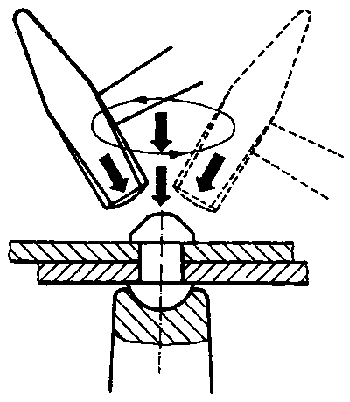
Figure 27 - Preforming
With countersunk-head rivetings, the rivet head can be driven
into the countersinking immediately.
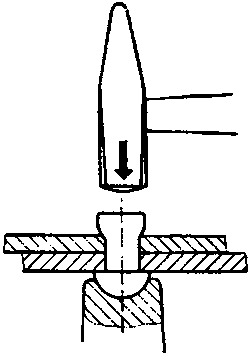
Figure 28 - Heading
6.6. Finish-forming of the button closing head
If the closing head has been preformed sufficiently, the head is
finish-formed by the rivet header.
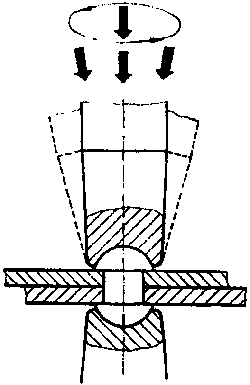
Figure 29 - Finish-forming
Note:
- Riveting by hand can be carried out in cold
condition of the steel rivet up to approximately 8 mm diameter - thicker rivets
must be worked in red-hot condition.
- Non-ferrous metal rivets are worked in cold condition after
having them annealed before.
With every cold working of steel or non-ferrous metal, the
material becomes hard and brittle, especially if it is formed by many hammer
blows. In order to keep the material as tough and elastic as possible, the rivet
should be shaped by a few, well-aimed blows.
Peculiarities of the technological process
- If no prefabricated button head rivets or countersunk-head
rivets are at disposal, steel or non-ferrous metal wires may also be used as
rivet bolts.
In this case, the rivet bolt has to be clamped in clamping jaws
for round material with a set head to be preformed.
If no clamping jaws for round material are at hand. the rivet
bolt must be preheaded in the rivet hole, the set head is formed, then the
workpiece is turned and the closing head is shaped.

Figure 30 - Sequence of operations
for a double-strap countersunk-head riveting with rivet bolt
- If hollow rivets shall be used, an allowance has to be
calculated as it is done with countersunk-head rivets; the rivet -after having
been inserted - is to be expanded by a centre punch and to be upset by two short
blows.
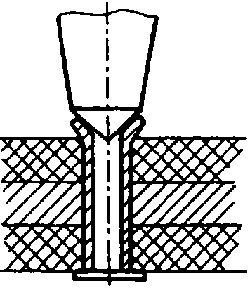
Figure 31 - Hollow rivet expanded by
a centre punch
What individual steps are required for making a button head
riveting?
________________________________________________________________________________________________________________________________________________________________
What is to be done, if individually drilled parts - when being
put together - show misaligned
holes?
________________________________________________________________________________________________________________________________________________________________
What hole must be drilled for a 4 mm thick
rivet?
________________________________________________________________________________
What countersink do you use to prepare countersunk-head riveted
joints?
________________________________________________________________________________
How must the countersinking diameter be for a 4 mm
countersunk-head
rivet?
________________________________________________________________________________

